Coding Range

What's the big deal with Titanfall and Azure? 

March 12th, 2014

Respawn engineer Jon Shiring says that since the beta ended, some skeptical devs have already changed their minds about the feasibility of using Azure for the parts of a game traditionally handled by a user’s console or PC. In Titanfall’s case, that largely includes artificial-intelligence-powered teammates.

“Back when we started talking to Microsoft about it, everyone thought it was kind of crazy and a lot of other publishers were terrified of even doing it,” Shiring says. “I’ve heard that since our beta ended, they’ve been pounding down the doors at Microsoft because they’re realizing that it really is a real thing right now.”

What’s the big deal with this? The Titanfall game servers are all running on Azure, but it doesn’t seem to be anything special. If I installed Source Dedicated Server on an Azure Virtual Machine I could have Left 4 Dead’s “artificial-intelligence-powered teammates” running on Azure too.

Swapping variables with XOR

February 10th, 2014

Thanks to @int_SiPlus_void the following tweet made it’s way onto my timeline today:

I’d actually never heard of this before until @dannolan pointed me to this Wikipedia page on the XOR swap algorithm.

The basics are pretty simple. To swap two variables ‘x’ and ‘y’, perform the following operations:

x = x XOR y
y = x XOR y
x = x XOR y

To test this out I put together a basic test project in Xcode, and it worked.

The next question then is whether or not this is actually any faster than the traditional swap, which is as follows:

temp = x
x = y
y = temp

To test this I wrote a dylib that expose two functions, traditional_swap and xor_swap. These were built with -O3 in Xcode 5.0.2 (5A3005) using:

Apple LLVM version 5.0 (clang-500.2.79) (based on LLVM 3.3svn)
Target: x86_64-apple-darwin13.0.2
Thread model: posix

The two functions are as follows:

void traditional_swap(int * x, int * y)
{
    int temp = *x;
    *x = *y;
    *y = temp;
}

void xor_swap(int * x, int * y)
{
    *x = *x ^ *y;
    *y = *x ^ *y;
    *x = *x ^ *y;
};

To test this I wrote a basic benchmark executable that invokes the functions from the dylib:

#include <stdio.h>
#include <time.h>

void xor_swap(int * x, int * y);
void traditional_swap(int * x, int * y);

int main(int argc, const char * argv[])
{
    void (*swapFn)(int * x, int * y);

    // Uncomment a line to use it in the benchmark
//  swapFn = xor_swap;
//  swapFn = traditional_swap;

    clock_t start = clock();

    int cRuns = 2500000;
    for (int i = 0; i < cRuns; i++)
    {
        int x = 88, y = 72;
        swapFn(&x, &y);
    }

    clock_t end = clock();
    fprintf(stderr, "time taken: %lu\n", end - start);
    fprintf(stderr, "avg time: %f\n", (end - start) / (double)cRuns);

    return 0;
}

I’d never used clock_t and clock() before, but given the results I assume they return a time representation in milliseconds. (Thank you Stack Overflow.)

The numbers are very similar each time the program is run, except the first time. I don’t know what’s slower about the first time, but I’d assume it’s some OS-level thing I can’t control.

Here’s the output for xor_swap:

time taken: 7116
avg time: 0.002846
Program ended with exit code: 0

Here’s the output for traditional_swap:

time taken: 6434
avg time: 0.002574
Program ended with exit code: 0

As it currently stands, xor_swap is roughly 10% slower than traditional_swap. This is also supported by the assembler that clang generated, adapted from Hopper:

_traditional_swap_f70:
push rbp
mov rbp, rsp
mov eax, dword [ds:rdi]
mov ecx, dword [ds:rsi]
mov dword [ds:rdi], ecx
mov dword [ds:rsi], eax
pop rbp
ret     

_xor_swap_f80:
push rbp
mov rbp, rsp
mov eax, dword [ds:rsi]
xor eax, dword [ds:rdi]
mov dword [ds:rdi], eax
xor eax, dword [ds:rsi]
mov dword [ds:rsi], eax
xor dword [ds:rdi], eax
pop rbp
ret

Ignoring the basic setup and teardown of each method, traditional_swap is fewer instructions and thus I would expect it to execute quicker (though I understand this is not neccesarily the always case).

traditional_swap consists of four movs, which I found interesting as I would logically expect 3 movs.

xor_swap consists of three sets of mov xor, which seems to make sense but I honestly don’t know too much assembler so I’ll have to trust the compiler on this one.

I wonder if either method could be improved with hand-written assembler, but perhaps I’ll leave that for another time.

Casually Norm: Excuses Are A Darkness 

January 26th, 2014

Everything we create from a passion or desire has value. Whether that “thing” makes us money, brings followers, page views, or something else…if you’re proud of what you’ve spent time on, the value is your own.

I have something in particular I’ve wanted to start, but I’ve been putting it off under the guise of excuses. Valid excuses, but excuses nonetheless.

I’m going to remain vague because it’s not something I’m willing to share yet, but suffice it to say that when I look at existing work in the field I often feel that I could do so much better than many existing works. When I actually sit down and try it though, I’m way too critical of my own work to read any value into what I’m doing.

On the other hand, “sucking at something is the first step to being sorta good at something”. It’s a process of iteration and refinement, and I need to find the patience to be patient and tolerant of my own inadequate and nooby output. I’m harder on myself than anyone else, and I don’t know why.

It’s hard being your own worst enemy, but it’s something I have to conquer. The first step is always the hardest.

Decoded: Steam In-Home Streaming Control Protocol

January 26th, 2014

With the Discovery protocol done, the control protocol’s format has proven to be quite elusive. Looking at a packet capture, the format seemed to be, repeated:

  • 3 bytes of unknown contents
  • 2 bytes big-endian, which is the payload size
  • N bytes, which is the payload

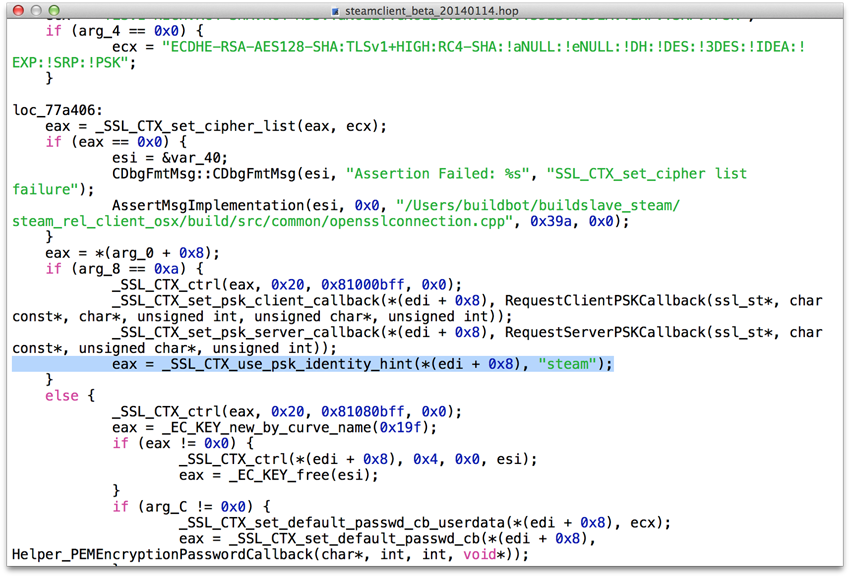
What eventually gave it away was that the string “steam” appeared in one of the packets, and following that in a disassembler pointed me to SSL PSK methods.

Finding clues from the string "steam"

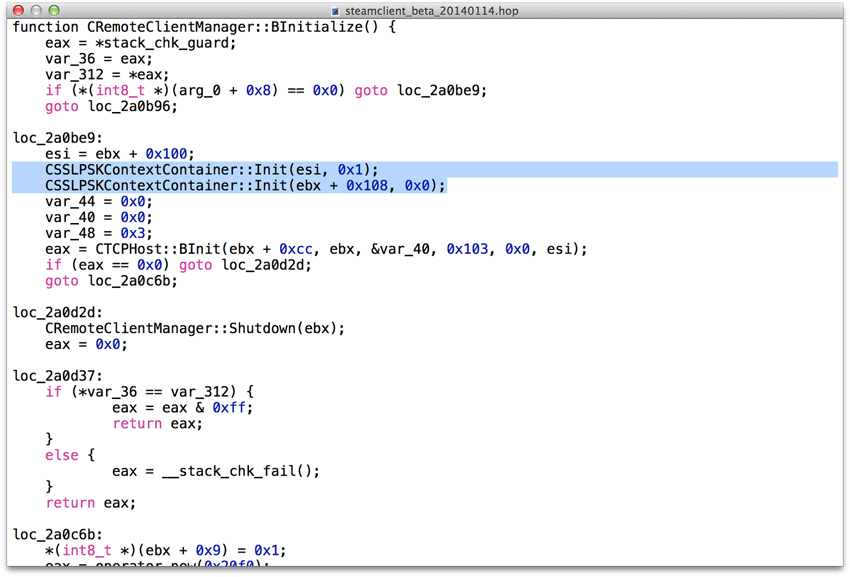
Of course, once I found that I noticed that it had been staring me in the face the whole time.

Steam's CSSLPSKContextContainer saying hi from CRemoteClientManager::BInitialize

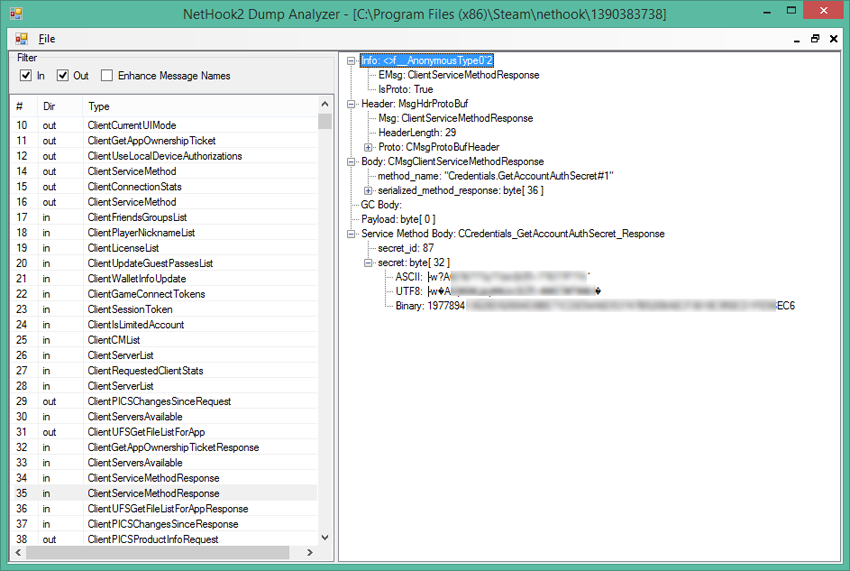
The next question then is, from where does the Pre-Shared Key (PSK) come from? That also turned out to have been staring me in the face for a while, as I found it quite quickly when looking at an old dump of Steam’s traffic from NetHook:

Steam's servers sending the Account Secret to a local Steam client

(Update: If you want to find your own key, Steam caches it in userdata/your Steam account ID/config/localconfig.vdf - look for ‘AuthData’ in the ‘SharedAuth’ section.)

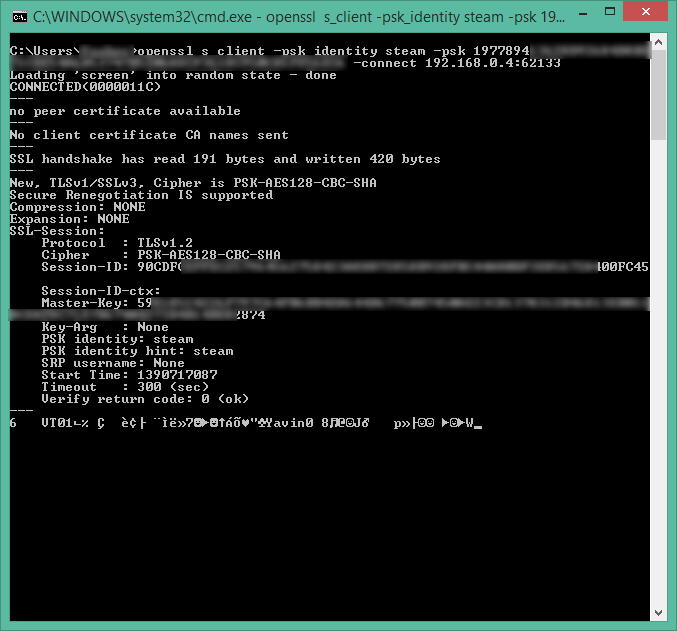
A quick test of that key showed that I was right.

Connecting to Steam In-Home Streaming with OpenSSL's s_client

A few things are instantly recognisable - VT01 is Valve’s “Magic” value for the TCP protocol that the Steam client uses to communicate with the Steam servers. The other recognisable string in there is “Yavin”, which is my computer’s machine name.

Most likely then, this follows the standard “CM Client” protocol which is:

  • Length: uint32, little-endian - length of the payload
  • Magic: uint32, little-endian - “VT01”
  • Payload: number of bytes specified in Length. The payload starts with a little-endiant uint32 EMsg value.

The relevant EMsg values for the Remote Control protocol are:

  • Auth: 0x251C (9500)
  • AuthResponse: 0x251D (9501)
  • AppStatus: 0x251E (9502)
  • StartStream: 0x251F (9503)
  • StartStreamResponse: 0x2520 (9504)
  • Ping: 0x2521 (9505)
  • PingResponse: 0x2522 (9506)

Unfortunately I can’t feasibly progress any further as I can’t find any decent libraries that support TLS-PSK. The only one I can find is OpenSSL (which is what Valve uses), but it’s so low-level that there’s an enormous amount of overhead before I can even send or recieve any data that it might just not be worth it.

Any third-party client would need to connect to Steam to obtain the Pre-Shared Key, which while doable, also adds a lot more work before I can even launch a game to stream.

If anyone knows of any high-level TLS-PSK client libraries, please let me know.

Decoded: Steam In-Home Streaming Discovery Protocol

January 14th, 2014

In-Home Streaming is coming soon to Steam. It lets you use input and output on one computer, and let another computer actually handle the rendering, calculations, networking etc. It’s like Remote Desktop but for games.

Some of IHS (In-Home Streaming) has already made it’s way into the Steam Client, as uncovered by the good folks over at SteamDB.

IHS seems to be composed of three layers worth of networking protocol, each of which instructs the client on how to connect to the next one.

  • Autodiscovery: to detect other Steam instances.
  • Steam Control1: to view installed games, launch games, and start streaming, Steam has a protocol for partial remote client control.
  • Streaming: to transmit controller input and recieve render output.

When the user opens the IHS Settings page, the Steam client sends a broadcast over the network, inviting any other Steam installations to announce their presence. When they do, Steam displays them in the settings menu and either lets the user connect2, or notifies the user that another account is logged on to the remote machine.

The protocol will be considerably easier to understand if you have an understanding of Protocol Buffers and have a read-through of the protocol buffers definitions file.

Protocol Basics

All communication is done over IPv4 and UDP on port 27036. The first 8 bytes of each UDP packet is 0xFFFFFFFFA05F4C21 (little-endian).

The next 4 bytes are the little-endian length of the header, followed by the header.

The next 4 bytes (after the header) are the little-endian length of the body, followed by the body.

Header

The header is a CMsgRemoteClientBroadcastHeader protobuf (Protocol Buffer) message. This contains:

  • a Client ID, which is a 64-bit unsigned integer that is randomly generated by each client.
  • a message type, which is an enum that specifies what the message body is.

Body

There are three types of body messages as follows.

Discovery

The discovery message is a CMsgRemoteClientBroadcastDiscovery protobuf. This contains:

  • a sequence number, which appears to be incremented each time the user visits the IHS Settings page.

The message type for this message is k_ERemoteClientBroadcastMsgDiscovery.

Discovery messages are sent as a broadcast, i.e. they are sent to IPv4 address 255.255.255.255.

Status

The status message is sent in response to a discovery message. This contains:

  • the TCP port to connect to for the Control protocol (see above)
  • what services, if any, are enabled. The only existing service currently is Remote Control (k_ERemoteClientServiceRemoteControl).
  • the host name of the machine
  • the minimum compatible version, assumedly of Steam Control protocol
  • the version, assumedly of the Steam Control protocol
  • which Steam users are logged in, I assume. Interestingly this is an array which would allow multiple Steam users to be logged in at once. I’m not sure if this is the full Steam ID or only the Steam Account ID.

The message type for this message is k_ERemoteClientBroadcastMsgStatus.

Offline

I’m not sure what causes the Offline message to be sent. This message also has no defined body, it only has an ERemoteClientBroadcastMsg value.


  1. For remote-controlling Steam, as opposed to remote-controlling games. Presumably this is used alongside the separate HTTP remote control protocol

  2. I assume, I haven’t actually been able to get that far. No matter what I try Steam says I have a different account logged in. 

DNS May Be Hazardous to Your Health

November 29th, 2013

Just because DNS behaves one way doesnt mean it’s going to behave the same way after the 2nd Tuesday of the month

The stuff this guy has done with DNS is crazy, genius, and scary.

Programming in a nutshell 

November 25th, 2013

Braces should go on the next line. Braces should go on the same line. Use tabs to indent. But tabs are evil. You should use stored procedures, but actually you shouldn’t use them. You should always comment your code. But good code doesn’t need comments.

Clever Code with the Ternary Operator

November 11th, 2013

One of the things I find myself having to use on a semi-regular basis in C# is the null-coalescing operator. It lets you transform the following block into a single line:

if (obj != null)
{
    return obj;
}
else
{
    return someDefault;
}

The single line is as follows:

return obj ?? someDefault;

Today I learned that C has a similar operator with a GNU extension. An expression using the standard ternary operator (?:) such as this one:

x ? x : y

can be rewritten as:

x ?: y

with the expression x only evaluated once, not twice. Extrapolating from here, this means that one could do null-coalescing (or rather, nil coalescing) in Objective-C. The most useful place something like this would occur be in lazy-loaded values. For example, this code:

@implementation Foo
{
    Bar * _bar;
}

- (Bar *) bar
{
    if (_bar != nil)
    {
        _bar = [[Bar alloc] init];
    }
    return _bar;
}

can be rewritten as:

@implementation Foo
{
    Bar * _bar;
}

- (Bar *) bar
{
    return _bar ?: (_bar = [[Bar alloc] init]);
}

This significantly detracts from the readability, but it’s a cool hack of what’s possible. I do think, however, that it’s an example of what one can do, and not of what one should do.

iOS App Distribution and the Magical World of Code-Signing

October 27th, 2013

It’s a well-known fact that the only apps that Apple allows to run on iOS are the ones that it approves. Developers submit apps to the App Store, Apple gives it the shiny seal of approval, and only then can users run them. For some types of apps though, there’s a different method to getting an app to run. There are three ways you can run an app on an un-jailbroken device which doesn’t require them actually going through Apple. These are:

  1. Development: When developers are working on their app, they can make changes and run them either in the iOS Simulator, or directly on any development device. Unlike some other platforms, however, a device does not have to be purpose-built as a ‘development device.’ Rather, any device can become a development device in just a few easy (or convoluted) steps.

  2. Enterprise Distribution: Businesses who are part of the iOS Developer Enterprise Program can build in-house apps which are distributed to any iOS device inside the organisation. These do not have to go through the App Store.

  3. Ad-Hoc Distribution: Most commonly used for beta testing, ad-hoc distribution allows developers to install builds on devices without going through Apple.

The Magic That Makes This Work

In cryptography, there are two main types of cryptography. (If there are others, I haven’t heard of them.)

Symmetric cryptography is probably what most people think of when they hear the words ‘Encrypt’ and ‘Decrypt’. With symmetric cryptography, you have a password that two parties know. Both parties use this key (password) to encrypt and decrypt the data. Anybody else with this key can encrypt and decrypt data exactly the same way.

Asymmetric cryptography is different. With asymmetric cryptography, there is not a single key, but a pair of keys. Data encrypted with one key can only be decrypted by the other matching key. If you encrypt data, but only hold one of the two keys, you then cannot decrypt the very data that you just encrypted.

Most commonly in applications of asymmetric cryptography, one key is designated the ‘public key’ and the other is designated the ‘private key’. As it’s name suggests, the public key is freely distributed to anyone who wants it. The private key is held near and dear by the owner, and nobody else can have it. This creates two situations:

  • Any data encrypted with the public key can only be decrypted by the holder of the private key
  • Any data that can be decrypted with the public key is guaranteed to have been encrypted by the holder of the private key.

By using these rules, one can encrypt some data with their private key and everybody else with the private key can trust that it came from the private key-holder. This is used in a technology known as Digital Signatures. By encrypting a file - or for efficiency’s sake, a hash of a file - with a private key, we can be certain that the file originated from the holder of the key.

All of this assumes that the encryption algorithm used hasn’t been broken and that two keypairs don’t collide.

So Back to iOS…

On iOS, all binaries must be signed in such a manner before they are run. For example, if I examine the code signature of Google Maps 1.0.0 using the codesign utility, I get the following result:

Executable=/Users/path/to/Google Maps.app/Google Maps
Identifier=com.google.Maps
Format=bundle with Mach-O thin (armv7)
CodeDirectory v=20100 size=27304 flags=0x0(none) hashes=1357+5 location=embedded
Hash type=sha1 size=20
CDHash=397440c3e826288b6be5a3cc0cff85dc54e10d84
Signature size=3582
Authority=Apple iPhone OS Application Signing
Authority=Apple iPhone Certification Authority
Authority=Apple Root CA
Signed Time=12 Dec 2012 12:18:49 pm
Info.plist entries=36
Sealed Resources version=1 rules=5 files=713
Internal requirements count=2 size=668

The important lines here are the ones starting with Authority. Using digital signatures and working from bottom to top, we can see that the Apple Root CA has trusted the Apple iPhone Certification Authority, which in turn has trusted Apple iPhone OS Application Signing. Apple iPhone OS Application Signing has signed this binary in particular, which signifies that this build came from the App Store. If I take a binary that I have signed, before it goes through Apple, I can see the following:

Executable=/Users/path/to/Backpack2.app/Backpack2
Identifier=com.professorfiddle.backpack
Format=bundle with Mach-O universal (armv7 armv7s)
CodeDirectory v=20100 size=1797 flags=0x0(none) hashes=81+5 location=embedded
Hash type=sha1 size=20
CDHash=08ef1886ca92aecbf7900f1e97e115455f1ba6ed
Signature size=4333
Authority=iPhone Distribution: [NAME REDACTED] ([TEAM ID REDACTED])
Authority=Apple Worldwide Developer Relations Certification Authority
Authority=Apple Root CA
Signed Time=16 Jul 2013 5:51:49 pm
Info.plist entries=30
Sealed Resources version=1 rules=3 files=89
Internal requirements count=1 size=192

Here I’ve removed my name and my Apple Developer Team ID, but again we see a similar story. Apple Root CA has trusted Apple Worldwide Developer Relations Certification Authority, which has trusted me to sign app builds for iPhone Distribution.

The delegation of trust is done using Certificates, which are basically a signed public key. Since my public key has been signed by Apple Worldwide Developer Relations Certification Authority, this shows that the holder of Apple WWDR’s private key has signed my key. If you trust anyone who Apple WWDR trusts, this proves that trust relationship. The same thing happens between WWDR and Apple Root CA. If you trust Apple Root CA, and you trust whoever they trust, then since Apple Root CA signed the Worldwide Developer Relations key, you should also trust Worldwide Developer Relations.

Thus, if you trust Apple, and Apple trusts Apple Worldwide Developer Relations, and Apple Worldwide Developer Relations trusts me, then you should probably trust me.

Provisioning Profile Hell

If it was that simple, and by simple I mean quite complicated but technically sound, then anybody with a developer certificate would be able to sign apps that anybody else could sideload onto their device. So, to go hand-in-hand with codesigning, is the document that Apple have termed a Provisioning Profile.

A Provisioning Profile is a document that lists a few things:

  • The Application ID itself. This is the ‘bundle identifier’ of the application, which must match the App ID in the Apple Developer Portal.
  • The Developer Certificates which are trusted to sign that application
  • An expiry date
  • A list of devices which are permitted to run the application
  • A Digital Signature to certify that this Provisioning Profile was created by Apple

This creates the following rules. You can run a sideloaded application if:

  • The application has a provisioning profile
  • The application is signed by a developer certificate that the profile allows
  • The device ID is included in the provisioning profile (not applicable for App Store or Enterprise distribution)
  • The provisioning profile came from Apple
  • The provisioning profile has not expired

Thus, in order to install a sideloaded application, you must pass all these rules.

Creating an Ad-Hoc Distribution Build

So in order to create an Ad-Hoc Distribution build, for beta testers etc., you must do the following:

  1. If you do not have a valid Distribution certificate, create one in the Apple Developer Certificates, Identifiers & Profiles Portal. If you don’t feel comfortable with Keychain Access and Certificate Signing Requests, Xcode can do this step for you. In Xcode 5, this can be done through Xcode > Preferences > your Apple ID > your Developer Team > View Details… > click the ‘+’ under Signing Identities > iOS Development

  2. If you don’t have one yet, create an App ID. This must be done through the Apple Developer Certificates, Identifiers & Profiles Portal. You probably shouldn’t use a Wildcard App ID, as you then can’t use many features such as Push Notifications and Game Center.

  3. Register any devices you want to run the build in the Devices section of the Certificates, Identifiers & Profiles Portal. This is done by the device’s UDID, and developer accounts have a limit of 100 devices per year. Any devices you remove still count towards the limit, however when your developer subscription expires, you can reset the list when you renew your subscription.

  4. Create a Provisioning Profile from the Certificates, Identifiers & Profiles Portal. You need to create an Ad-Hoc Distribution profile for the App ID you created in step 2. Select the certificates you want to be able to sign these builds, and the devices you want to run them on.

  5. Download the profile and drag it onto the Xcode icon in your dock (or anywhere else reasonably) to install the profile in Xcode.

  6. Make sure your project’s Bundle ID (CFBundleIdentifier) matches the App ID you created in step 2. This can be found in your Info.plist file (or SomeName-Info.plist), or by opening the Project in the editor from the Project Navigator (just click on the project itself).

  7. Build and Archive. To do this, select ‘Archive’ from the ‘Product’ menu. Note that the Archive option is unavailable if the current launch target is the iOS Simulator. Set this to ‘iOS Device’ or any device you have connected in order to build for a device.

  8. In the Archives section of the Organizer, select your archive and click on ‘Distribute…’. Select ‘Save for Enterprise or Ad-Hoc Deployment’ and select the Provisioning Profile you created in step 4.

  9. Give the IPA to your friends, upload it to TestFlight or Hockey, etc.

Hopefully that’s enough information not just to create a distribution build, but to be able to troubleshoot the process when something inevitable goes wrong. Which it usually does somewhere along the line.